Let's Encrypt Encrypts The Internet
December 18, 2015•1,443 words
Letsencrypt has launched its public beta, and I (more than a year after my last blog post) have finally found something to talk about again.
But first things first. Some of you might not even know what the hype around Letsencrypt is about or what Letsencrypt itself actually is. So I'll try to explain shortly why it is something to have an eye on.
Encryption on the internet
You have hopefully already encountered several sites on the internet that use encryption (recognisable by the leading https://). Encryption has been a vital part of it for nearly two decades now, but was mostly used on sites that absolutely require it (like e-banking or shopping). This is primarily because of two reasons: first using encryption requires more computational power, second getting a certificate can be quite expensive.
The first issue lost a bit of relevance as technology advanced and we got more computational power at our disposal than ever before. The second issue is the one that is being attacked by Letsencrypt.
A certificate is basically used to proof to a connected client, that you are who you claim to be. Without such a mechanism anybody could intercept the traffic (given he/she has got the needed infrastructure) and act like someone else. So instead of visiting your website, the client could land on a completely different, maybe even malicious, website, still thinking that it is yours. This basically would also nullify any encryption approaches, as the attacker could just initiate two encrypted connections: one to the client, one to the actual server, the client is trying to reach. Then s/he can forward the responses from one connection to the other, adding some slight modifications to the content.
So that this doesn't happen, we need someone who will guarantee to the client, that everything is fine and noone is intercepting the traffic and/or exchanging the contents of the website.
This is the role of the certificate authorities.
What they do is: they verify the ownership of a website and then provide the website owner with a certificate, which he can use to sign his/her messages. Then the client can look up if the traffic coming from this domain was signed with a certificate approved by a certificate authority that he trusts (= his browser trusts).
In order to verify your identity, the certificate authorities require you to send them some kind of proof of your identity, like a scan of your passport. They will then check your identity against the data which was used to register your domain (its whois entry). If the two match each other, they will provide you with a certificate for the specified domain. Of course they require you to pay a certain amount of money, especially since they also need to pay their employees, who will verify your identity.
Letsencrypt's approach
So what does Letsencrypt do differently?
Letsencrypt does not have any employees that will verify your identity, neither does it require you to send them any verification of your identity. Instead of comparing the domain info and your info, it just skips that step and directly verifies that you own that domain. It does so by requiring you to install their software on your server, which will then change the content of your website, that is reachable under your domain. They will then check if they can verify those changes using their backend software. Currently Letsencrypt supports Apache and nginx (still experimental), as well as a standalone approach, which will require you to stop your webserver for the process. In order to guarantee security, those certificates are only valid for a remarkably short period of time (~90 days), and they are already planning to even lower that period further. This clearly shows that they want you to automate this process, instead of manually requesting this certificate every time.
In my case I had to use the manual process, as the nginx component is still experimental, but I'll gladly switch to the automatic version once it is stable. Anyhow the process was still pretty straight forward. After disabling nginx, i just had to enter the following commands to get started.
Update from 2019: You should now easily be able to install certbot from your distributions package repository. No need to checkout the git repository.
git clone https://github.com/letsencrypt/letsencrypt.git
cd ./letsencrypt
./letsencrypt-auto certonly
Now you have to enter the domain names you want to get a certificate for, wait a little and then you're all set for an encrypted website.
Getting TLS right
Getting the certificate is only half of the work. Next you need to reference the certificate inside your server settings and define the right ciphers, so that your website really gets secure. As you are hosting your own webserver, I just assume that you know how to configure the certificates themselves correctly (if you are using nginx, you can take a look at the example below).
It's the ciphers where it really gets interesting. Ciphers basically define how the webtraffic to your server gets encrypted. If you use ciphers that are too fancy, you risk that a lot of clients won't support your ciphers and can't reach your website, on the other hand, if you include a cipher that is too weak, it can potentially break your whole encryption effort. At the beginning of the communication the client and the webserver agree on a certain cipher suite, which will get used henceforth. So if you support weak or even broken ciphers, a potential attacker can try to downgrade to that cipher and decrypt the whole communication.
A good starting point to know which ciphers to support is the Mozilla Wiki. I just went ahead and picked the cipher suite they recommend for "Modern compatibility". However I had to adjust the suite a little bit, as they are still using DHE in their suite, which is not that safe any more. At least not safe in the way of "These keys, the paper showed, can be cracked within a year for around 100 million US dollars.". So to counter that issue, we simply have to kick the DHE suites out, so that only the elliptic curve variations of the Diffie-Hellman key exchange (=ECDHE) suites remain. ECDHE uses a similar kind of algorithm, but a different kind of math behind it (elliptic curves), so that it can provide the same level of security with much smaller numbers. We can use this, to guarantee a much higher security, with about the same size of numbers.
Now we have a good cipher suite to start with, but this suite leaves a lot of clients behind. Therefore we have to add an algorithm, that is old enough for these clients to support, but secure enough so that the communication can not be decrypted. The suite that comes to our rescue is DES-CBC3-SHA. We can add this suite at the very end of all the other cipher suites (but before the forbidden values, which are marked with a !). After that we have to remove the !3DES rule from our suites as well, because we are using 3DES inside the newly added suite. So that's how the cipher suite should look like afterwards:
ECDHE-RSA-AES128-GCM-SHA256:ECDHE-ECDSA-AES128-GCM-SHA256:\
ECDHE-RSA-AES256-GCM-SHA384:ECDHE-ECDSA-AES256-GCM-SHA384:ECDHE-RSA-AES128-SHA256:\
ECDHE-ECDSA-AES128-SHA256:ECDHE-RSA-AES128-SHA:ECDHE-ECDSA-AES128-SHA:\
ECDHE-RSA-AES256-SHA384:ECDHE-ECDSA-AES256-SHA384:ECDHE-RSA-AES256-SHA:\
ECDHE-ECDSA-AES256-SHA:DES-CBC3-SHA:!aNULL:!eNULL:!EXPORT:!DES:!RC4:!MD5:!PSK
Now that we have defined the cipher suite, we need to make sure, that the newly added 3DES suite will not be used by old clients, if they already support newer (and better) cipher suites, that do provide perfect forward secrecy. Unfortunately those clients often don't know what's best for them and use the older 3DES suite, as they think it is more secure. To countermeasure that, we simply need to tell our server, that he should insist on his order of ciphers. We do so by adding ssl_prefer_server_ciphers on to our configuration.
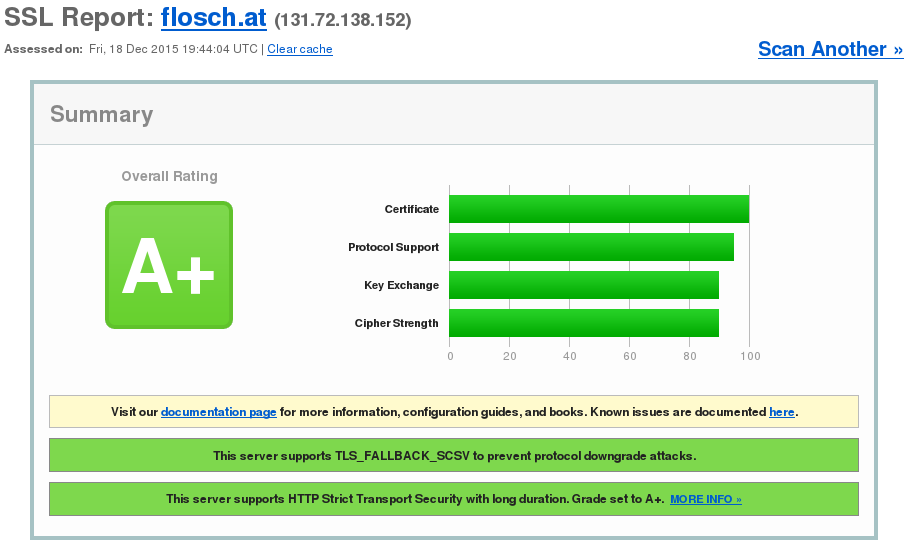
Finally, if you really want to completely secure all traffic to your server (and get a super fancy A+ rating on your encryption), you should add HTTP Strict Transport Security to your configuration by specifying add_header Strict-Transport-Security "max-age=15724800; preload" inside your config. However note, that this will ensure that your server is only reachable via HTTPS, so you could easily break some things by that. My final configuration looks just like this:
server {
  listen 0.0.0.0:443;
  listen [::]:443;
  ssl on;
  ssl_protocols TLSv1 TLSv1.1 TLSv1.2;
  ssl_prefer_server_ciphers on;
  ssl_ciphers "ECDHE-RSA-AES128-GCM-SHA256:ECDHE-ECDSA-AES128-GCM-SHA256:\
    ECDHE-RSA-AES256-GCM-SHA384:ECDHE-ECDSA-AES256-GCM-SHA384:ECDHE-RSA-AES128-SHA2\
    56:ECDHE-ECDSA-AES128-SHA256:ECDHE-RSA-AES128-SHA:ECDHE-ECDSA-AES128-SHA:ECDHE-\
    RSA-AES256-SHA384:ECDHE-ECDSA-AES256-SHA384:ECDHE-RSA-AES256-SHA:ECDHE-ECDSA-AE\
    S256-SHA:DES-CBC3-SHA:!aNULL:!eNULL:!EXPORT:!DES:!RC4:!MD5:!PSK";
  add_header Strict-Transport-Security "max-age=15724800; preload";
  ssl_certificate /etc/letsencrypt/live/flosch.at/fullchain.pem;
  ssl_certificate_key /etc/letsencrypt/live/flosch.at/privkey.pem;
  server_name flosch.at www.flosch.at;
  index index.html;
  root /srv/http/flosch.at;
}
That's it! You should now have a secure webserver. You can test it yourself by visiting the SSL Server Test website by Qualys SSL Labs.